APPLY FOR A SPONSORED VISA
User Logged in Home Page
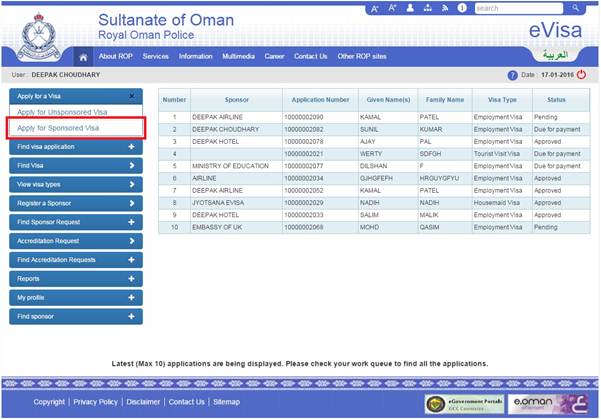
User's Logged in Home Page in English
● Once logged in, click on the "Apply for Sponsored Visa" link to apply for a Sponsored Visa, as shown in the above screenshot.
Sponsor Selection and New Visa Transaction
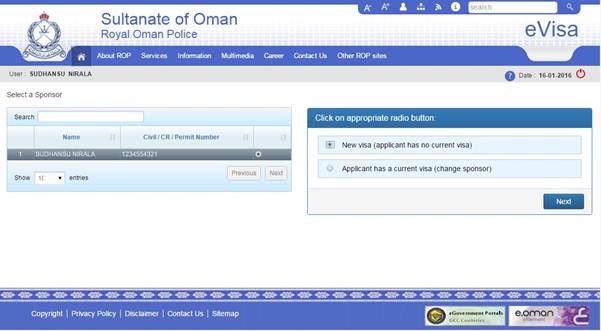
Sponsor Selection and New Visa Transaction Screen
● Select a Sponsor from the list of available Sponsors.
● Then select the option "New visa (applicant has no current visa)" available in the pop-up and click on the "Next" button in the same pop-up.
● This flow will follow the "Apply for a Sponsored Visa" process.
Button Functionality
|
Buttons |
Description |
|
Next |
To proceed further with the Visa Application once a Sponsor and (New visa) has been selected. |
Sponsor Selection and New Visa Transaction Screen Buttons
Visa Type and Subtype Selection
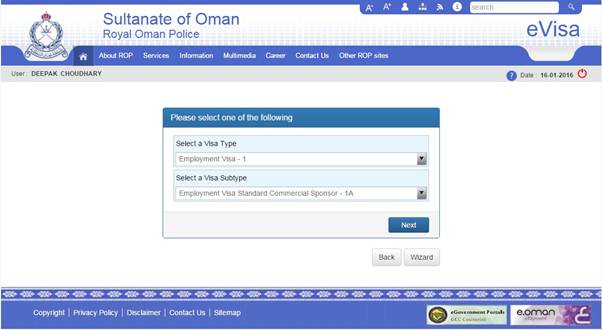
Visa Type and Visa Subtype Selection
● Make a Visa selection by either:
Case 1: Selecting a Visa type and a Visa subtype (if applicable). You can select a Visa Type and a Visa Subtype through the Dropdowns as shown in the screenshot above. After making your selection, click on the "Next" button to proceed to the Visa Type Selection Confirmation screen.
Case 2: You can select a Visa type and a Visa subtype by using the Wizard option as shown in the screenshots above. This will lead you to a list of all types of visit and residency Visas as shown in 2.6 Selection via Wizard.
Selection via Wizard
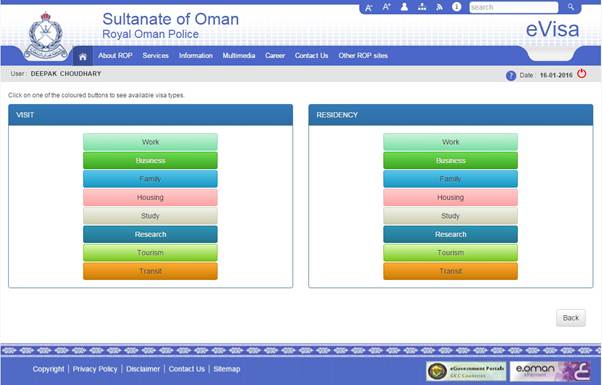
● All the different types of Visas for "VISIT" and "RESIDENCY" appear in the list as shown above. You must select a Visa purpose from the shown purposes. Selecting one of these Visa purposes will lead to a list of Visa subtypes as shown in the below screenshot. This list pertains to the "Work" purpose Visas in the "RESIDENCY" category.
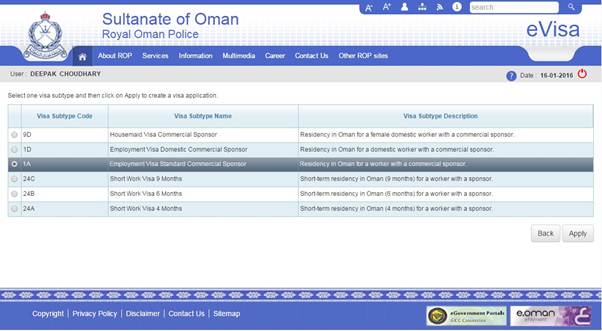
● Select the radio button for the appropriate Visa Subtype. After making your selection, click on the "Apply" button to proceed to the Visa Type Selection Confirmation screen.
Button Functionality
|
Buttons |
Description |
|
Back |
Navigate back to the Wizard screen. |
|
Apply |
Navigate to the Visa Type Selection Confirmation screen. |
Visa Subtype Selection Screen Buttons
Visa Type Selection Confirmation
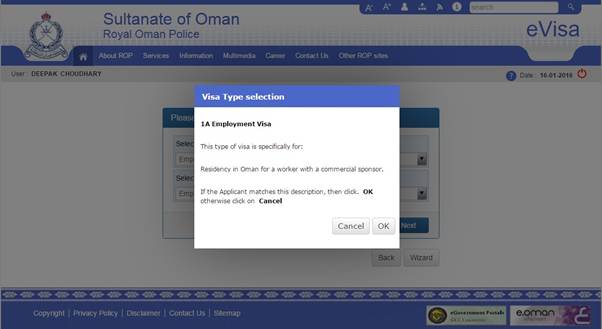
Visa Subtype Confirmation Pop-Up Screen
● After selecting a Visa Subtype, click on the "Next" or "Apply" button, the system will display a confirmation message for the Visa Type selection.
● Click on the "OK" button to proceed further.
Button Functionality
|
Buttons |
Description |
|
Cancel |
To cancel the Visa Type and Visa Subtype selection and navigate back to the selection screen. |
|
OK |
Navigate to Travel Document Details screen. |
Visa Subtype Confirmation Pop-Up Screen Buttons
Travel Documents Details
Travel Documents Details Arabic
Case 1: When the Nationality of the Applicant is an Arab group country; as in this case, some of the applicant details must be entered in Arabic as shown in the screenshot below.

Travel Document and Applicant Details Screen (Arab National)
Note: If the nationality of the applicant is an Arab group country, the Place of Issue and Full Name in the Travel Document Details and the Place of Birth in the Applicant Details sections must be entered in Arabic. Given Name(s) and Family Name will always be entered in English.
Travel Documents Details English
Case 2: When the Nationality of the Applicant is not an Arab group country; as in this case, all the applicant details must be entered in English.

Travel Document and Applicant Details Screen (Non Arab National)
Travel Document Details
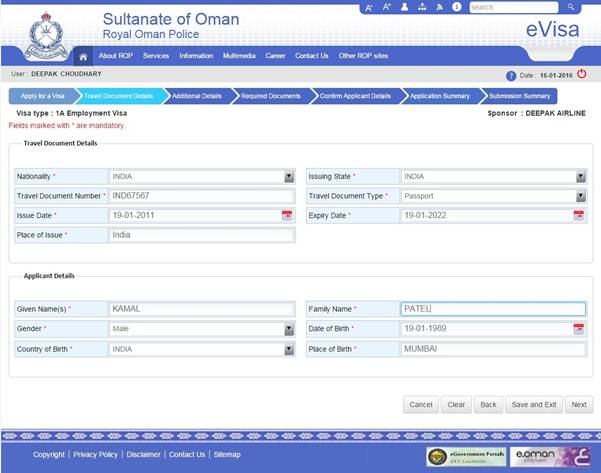
Travel Document and Applicant Details Screen
● To proceed further with the Visa Application process, enter the Travel Document details and Applicant Details. Fields indicated with an asterisk (*) are mandatory fields.
The following table describes the fields displayed:
|
Travel Document Details (Please enter the details as mentioned on the Travel Document.) |
|||
|
Field Name |
Description |
Data Type |
Max field length |
|
Nationality |
The applicant’s nationality. Exactly as stated on the Travel Document. |
Dropdown |
List of Countries (A-Z order) |
|
Issuing State |
The state where the applicant’s Travel Document was issued. Exactly as stated on the Travel Document. |
Dropdown |
List of Countries (A-Z order) |
|
Travel Document Number |
The applicant's Travel Document number. Exactly as stated on the Travel Document. |
Alphanumeric |
20 |
|
Travel Document Type |
The Travel Document type. E.g.: ● Passport ● Diplomatic Passport ● Royal Passport ● Seaman’s Book ● Red Cross Document ● Etc. |
Dropdown |
N/A |
|
Issue Date |
The Travel Document issue date. Exactly as stated on the Travel Document. The Issue Date must be before Expiry Date of the Travel Document. |
Text Box Date Selector |
Date format: DD-MM-YYYY |
|
Expiry Date |
The Travel Document expiry date. Exactly as stated on the Travel Document. The Expiry Date must not be before the Issue Date of the Travel Document. |
Text Box Date Selector |
Date format: DD-MM-YYYY |
|
Place of Issue |
The place where the Travel Document was issued. Exactly as stated on the Travel Document. |
Alphabetic (A-Z/a-z) and Space |
40 |
|
Full Name (in Arabic) |
Applicant's name in Arabic. Exactly as stated on the Travel Document. Only for Arab League nationalities. |
Arabic Text |
160 |
Travel Document Details Field Description
|
Personal Details (Please fill the information as mentioned on the Travel Document.) |
|||
|
Field Name |
Description |
Data Type |
Max field length |
|
Given Name(s) |
Applicant's first names. Exactly as stated on the Travel Document. |
Alphabetic (A-Z/a-z) and Space |
80 |
|
Family Name |
Applicant's last name. Exactly as stated on the Travel Document. |
Alphabetic (A-Z/a-z) and Space |
40 |
|
Gender |
Select the applicant's Gender. Exactly as stated on the Travel Document. |
Dropdown |
Values: ● Male ● Female |
|
Date of Birth |
Applicant's Date of Birth. Exactly as stated on the Travel Document. |
Text Box – Date Selector |
Date format: DD-MM-YYYY |
|
Country of Birth |
Select the applicant's country of birth. Exactly as stated on the Travel Document. |
Dropdown |
List of Countries (A-Z order) |
|
Place of Birth |
Enter the applicant's place of birth. Exactly as stated on the Travel Document. |
Alphabetic (A-Z/a-z) and Space |
40 |
Applicant Details Field Description
Button Functionality
|
Buttons |
Description |
|
Cancel |
To cancel the current application and return to the User's Logged in Home Page screen. |
|
Clear |
To clear the filled in data on the form. |
|
Back |
Navigate back to the Visa Subtype Selection Screen |
|
Save and Exit |
To save the application and continue filling it out at a later stage. |
|
Next |
Navigate to the Additional Details screen. |
Travel Document and Applicant Details Screen Buttons
Additional Details
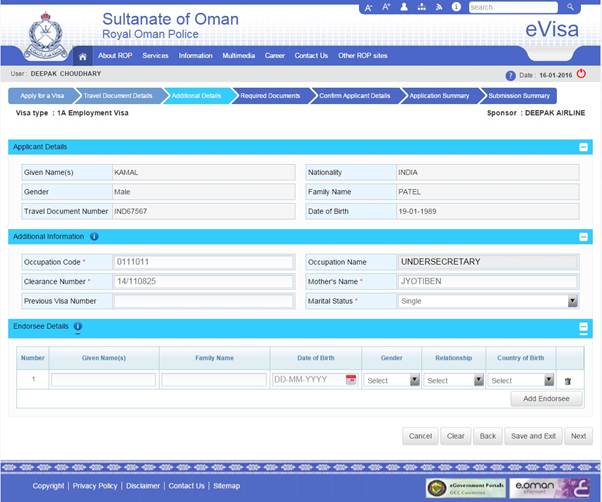
● Enter the Additional Details (if required) on the Visa Application and then click on the "Next" button to proceed further.
The following table describes the fields displayed:
|
Additional Information (Based on Visa Subtype selection) |
|||
|
Field Name |
Description |
Data Type |
Max field length |
|
Occupation Code |
Occupation Code from the MOMP clearance documentation. |
Numeric |
10 |
|
Occupation Name |
Auto populated occupation name, for Occupation Code provided. |
Display Only |
N/A |
|
Clearance Number |
Company clearance number from the MOMP clearance documentation. |
Numeric |
20 |
|
Previous Visa Number |
Provide previous Visa number details. (Optional) |
Numeric |
9 |
|
Mother's Name |
Applicant's Mother's first name. |
Alphabetic (A-Z/a-z) and Space |
20 |
|
Civil Number |
Civil Number as per applicant employment card. |
Numeric |
10 |
|
Full Name (in Arabic) |
Full name in Arabic for Arab nationals. |
Arabic Text |
243 |
|
Relationship |
Provide details of relationship with the Applicant. |
Dropdown |
Values: ● Spouse ● Father of citizen ● Mother of citizen ● Son (Includes step-son) ● Etc. |
|
Oman Visa Number |
Provide Oman Visa number, will be applicable if you have already got a Visa. Applicable to specific countries. |
Numeric |
9 |
|
GCC Occupation |
Provide GCC occupation code, issued by Oman government. |
Numeric |
10 |
|
Nationality |
Provide companion’s Nationality. |
Dropdown |
List of Countries (A-Z order) |
Additional Details Screen Field Description
|
Endorsee (Optional fields for all Visa subtype) |
|||
|
Field Name |
Description |
Data Type |
Max field length |
|
Given Name(s) |
First names of the endorsee. |
Alphabetic (A-Z/a-z) and Space |
80 |
|
Family Name |
Last name of the endorsee. |
Alphabetic (A-Z/a-z) and Space |
40 |
|
Date of Birth |
Date of birth of the endorsee. |
Text Box Date Selector |
Date format: DD/MM/YYYY |
|
Gender |
Gender of the endorsee. |
Dropdown |
Values: ● Male ● Female |
|
Relationship |
Relationship with the applicant. |
Dropdown |
Values: ● Child |
|
Country of Birth |
Endorsee's country of birth. |
Dropdown |
List of Countries (A-Z order) |
Endorsee Details Field Description
Button Functionality
|
Buttons |
Description |
|
Cancel |
To cancel the current application and return to the User's Logged In Home Page screen. |
|
Clear |
To clear the filled in data on the form. |
|
Back |
To return to the Travel Document and Applicant Details screen. |
|
Save and Exit |
To save the application and continue filling it out at a later stage. |
|
Next |
Navigate to the Required Documents screen. |
Additional Details Screen Buttons
Save and Exit
● The Visa Application can be saved at "Travel Document", "Additional Details", "Required Documents" or "Confirm Application Details" screens with details provided up to that screen by clicking on the "Save and Exit" button.
● For example, if the Visa Application is saved at the "Additional Details" screen, then Travel Document details and additional details of the Visa Application will be saved.
● You can re- submit the Visa Application within a predefined resubmission period. When re-submitting the Visa Application, you can edit already provided details and documents if required.
● If you exceed the predefined resubmission period, the Visa Application will be deleted and you will have to fill in a completely new Visa Application.
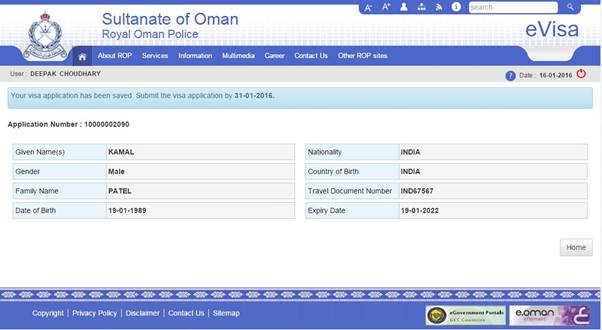
● Once clicked on the "Save and Exit" button the system will display the Save and Exit screen which displays the Visa Application number, personal details and a confirmation message. e.g. "Your Visa Application has been saved and submits the application by 06-02-2015".
Button Functionality
|
Buttons |
Description |
|
Home |
Navigate to the User Logged in Home Page screen. |
Required Documents

Required Documents and Optional Documents Screen
● For any Visa Application, a set of documents are required in order to process the Visa Application. There is an attachment option in the attachments section that is pre-filled with the required documents based on the Visa subtype.
● Once the Required Documents are attached, click on the "Next" button to proceed further.
Note: there is a limit of 512 KB for each attachment and the system will only accept the attachments if they adhere to this size limit.
Ensure that the following are also complied with:
● When attaching photos: only .jpeg, .jpg and .png formats are allowed.
● When attaching other documents: only .jpeg, .jpg, .png and .pdf formats are allowed.
The following table describes the fields displayed:
|
Required Documents and Optional Documents sections |
|
|
Field Name |
Description |
|
Number |
Sequence number for documents |
|
Required Documents |
Name of the required document attachment |
|
File Name |
Fine name of the attachment as per the name saved by you/system on you device |
|
File Size |
Size of the attachment. Eg 512 Kb |
Required Documents Screen Field Description
Button Functionality
|
Buttons |
Description |
|
Cancel |
To cancel the current application and return to the User’s Logged In Home Page screen. |
|
Back |
To go back to the Additional Details screen. |
|
Save and Exit |
To save the application and continue filling it out at a later stage. |
|
Next |
Navigate to the Confirm Details screen. |
|
Browse |
To browse and upload the attachment from your computer/device. |
|
Delete Icon |
If required a User can delete an attachment by clicking on the "Delete" icon. |
|
Eye Icon |
Certain Visa Application documents must be sighted by a vetting officer, for those documents an "eye" icon will be displayed next to it. |
Required Documents Screen Buttons
Confirm Application Details
Confirm Application Details Screen (Top)
Confirm Application Details Screen (Bottom)
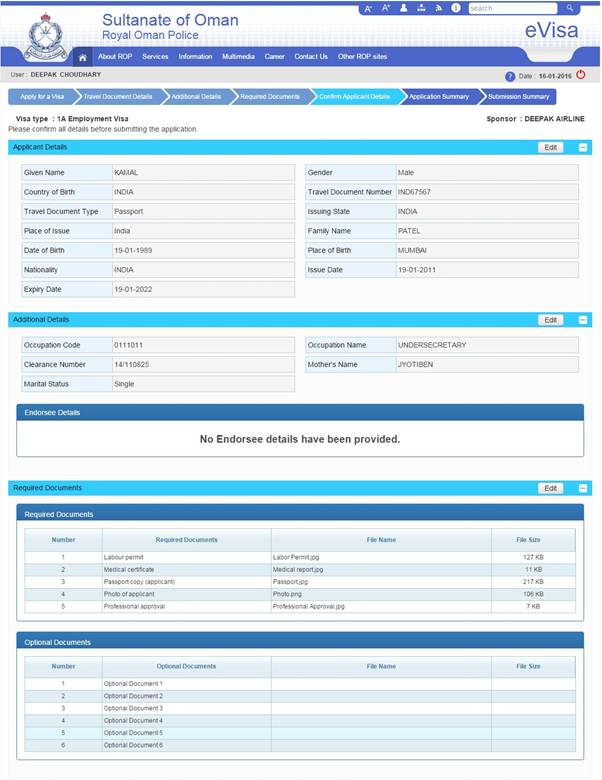
● After attaching the relevant documents, you need to confirm the details to ensure that all the details included are correct.
● After reviewing the details, click on the "Next" button to proceed further.
● If you wish to edit any of the fields, there is an "Edit" button for applicant details, additional details and required documents sections. Once you have clicked on the "Edit" button, you will be navigated to the particular page and once you have edited the information you can follow the basic flow of the Visa Application back to this confirmation page.
Button Functionality
|
Buttons |
Description |
|
Cancel |
To cancel the current application and return to the User's home screen. |
|
Back |
Navigate to the Required Documents Details screen. |
|
Save and Exit |
To save the application and continue filling it out at a later stage. |
|
Next |
Navigate to Confirmation pop-up screen. |
Confirm Application Details Screen Buttons
Confirmation Pop-Up
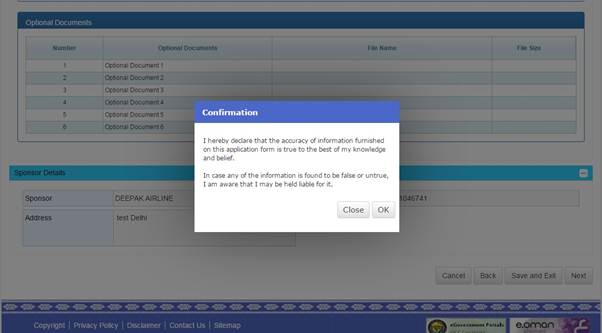
● After clicking on the "Next" button, a Confirmation prompt will appear where you need to click on the "OK" button to proceed further.
● You must agree the information provided in the confirmation pop-up i.e.
1) I hereby declare that the accuracy of information furnished on this application form is true to the best of my knowledge and belief.
2) In case any of the information is found to be false or untrue, I am aware that I may be held liable for it
Button Functionality
|
Buttons |
Description |
|
Close |
To cancel the Confirmation pop-up and navigate to the Confirm Application Details screen. |
|
OK |
Navigate to the Application Summary and Payment screen. |
Application Summary and Payment

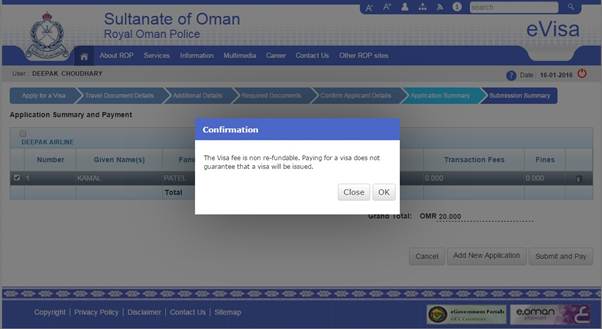
Application Summary and Payment Screen
● After the Confirmation prompt, you will be directed to the Application Summary page by selecting the check box for the application that you wish to process, the “Submit and Pay” button will be activated.
● You will also be able to view the total amount that is due for payment to process the application.
● Clicking on the “Submit and Pay” will direct you to the payment gateway if required.
Fees Description:
● Visa Fee: Fee required for a Visa.
● Transaction Fee: Fee required for the particular transaction ex. Apply for Visa, Renew Visa etc.
● Fines: It may include an overstay and ministries fines.
Button Functionality
|
Buttons |
Description |
|
Cancel |
Cancel the payment for the Visa Application and navigate back to the User Logged in Home Page screen. |
|
Add New Application |
To add another Visa Application. When this button is clicked, you will be navigated to the Sponsor selection screen and the rest of the process is Repeated. |
|
Submit and pay |
To make a Visa Application payment. |
Application Summary and Payment Screen Buttons
Add New Application

Submit and Pay Confirmation Pop-Up
Submit and Pay Confirmation Pop-Up Screen
● Tap continue to proceed visa application, then provide Payment Info.
● Click on the "OK" button to proceed to the payment gateway.
Button Functionality
|
Buttons |
Description |
|
Close |
To cancel the payment confirmation pop-up and navigate back to the Application Summary and Payment screen. |
|
OK |
Navigate to the Payment Gateway's Cardholder details screen. |
Submit and Pay Confirmation Pop-Up Screen Buttons
Payment Gateway Process Flow
Cardholder Details
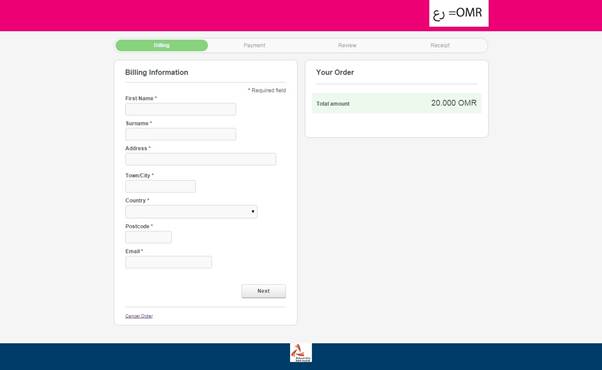
● Enter the details in the fields and click on the "Next" button to proceed further.
● You can also click on the "Cancel Order" button as shown above. This will save your application and you can make the payment at a later stage by clicking on the "Re-payment" button, which is shown in the screenshot below.
Button Functionality
|
Buttons |
Description |
|
Cancel Order |
To cancel the payment and navigate to Submission Summary screen. |
|
Next |
Navigate to Card Details screen. |
Cardholder Details Screen Buttons
2.18.2 Card Details
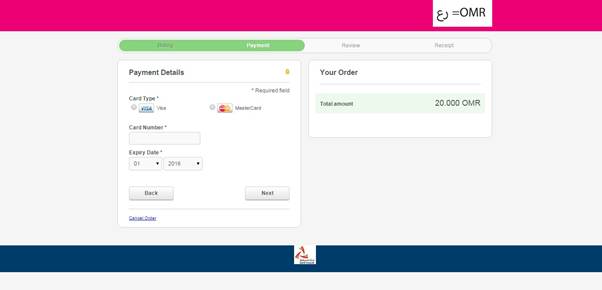
● Enter the card details for the payment and click on the "Next" button.
Button Functionality
|
Buttons |
Description |
|
Cancel Order |
To cancel the payment and navigate to Submission Summary screen. |
|
Next |
Proceed to Card Details Confirmation screen. |
|
Back |
Navigate to Cardholder details screen. |
Card Details Confirmation
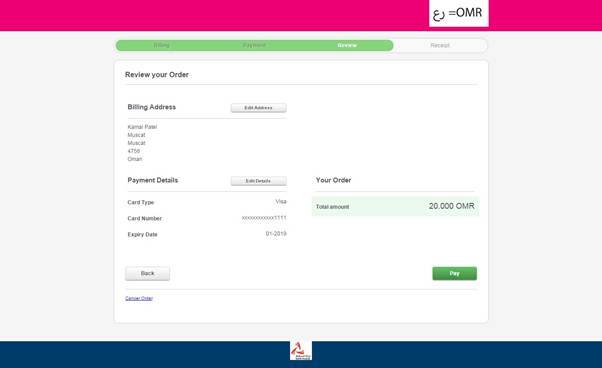
Card Details Confirmation Screen
● Click on the "Pay" button for the transaction to take place.
● After the payment is made, you will be directed to the Submission summary screen.
Button Functionality
|
Buttons |
Description |
|
Edit Address |
Navigates to the Cardholder Details screen to edit address details if required. |
|
Edit Details |
Navigates to the Cardholder Details screen to edit details if required. |
|
Cancel Order |
Cancel the payment and navigate to the Summary and Payment screen. |
|
Back |
Navigate to the Cardholder Details screen. |
|
Pay |
To make a payment for the Visa Application. |
Card Details Confirmation Screen Buttons
Re-Payment Process
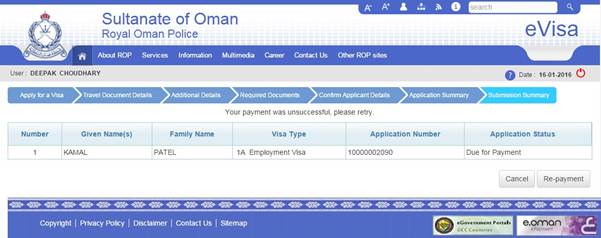
Submission Summary Screen (Payment Failure)
● If for some reason the payment is not made, the system will navigate you to the Submission Summary screen. To re-initiate the payment process, click on the "Re-payment" button.
Button Functionality
|
Buttons |
Description |
|
Cancel |
To cancel the payment and navigate to User’s home screen. |
|
Re-payment |
Proceed to Payment Confirmation screen. |
Table Submission Summary Screen (Payment Failure) Buttons
2.20 Submission Summary Screen
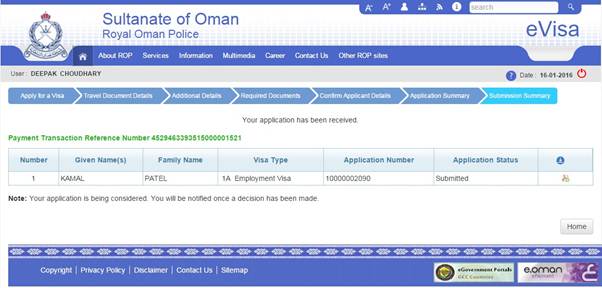
Submission Summary Screen (Payment Successful)
●
A "Payment Transaction
Reference Number" will be displayed, once payment is successfully made. This
screen also provides an option to download the payment receipt, which covers
the Payment, Travel Document, Personal and Sponsor details by clicking on the
"Adobe PDF icon" (![]() ).
).
● A confirmation email with payment receipt and an SMS will be sent to the registered email address and phone number of the Sponsor and/or Applicant.
● At this stage your Visa Application has been submitted for vetting, once the Visa Application is either approved, rejected or there is a request for more information, you will be notified through email and SMS.
Button Functionality
|
Buttons |
Description |
|
Home |
Navigate to login User home screen. |
|
Adobe PDF icon |
To download payment receipt to you device |
Submission Summary Screen (Payment Successful) Buttons
Payment Receipt


APPENDIX A - GLOSSARY OF TERMS
|
Term |
Definition |
|
DGPR |
Directorate General of Passport and Residency. |
|
eVisa |
Electronic Visitors International Stay Admission |
|
PRO |
Public Relation Officer term is used for an Oman citizen, who is accredited to apply for visa on behalf of corporate sponsor. |
|
ROP |
Royal Oman Police |
|
Sanad |
A government entity which can apply for a visa on behalf of an individual or a corporate sponsor. |
APPENDIX B - DESCRIPTION OF ICONS
|
Icon |
Description |
Function |
|
|
Browse Icon |
Browse document from device. |
|
|
Eye sight Icon |
Indication for required document(s) to be sighted by vetting officer. |
|
|
Information Icon |
Provide information about the document type and size. |
|
|
Delete Icon |
Deletes Visa application or document(s) |
|
|
Edit Button |
Used to edit relevant details. |
|
|
Expand |
Expands Grid |
|
|
Collapse |
Collapse Grid |
|
|
Adobe PDF Icon |
Download document device. |